Deck Building
Introduction
This is a guide about how to approach deck building, and featuring some suggested decks.
While most of the concepts we discuss can be applied while levelling, the major focus is on max level deck building.
Tricks of the Trade
This is a collection of key point to keep in mind when deck building. For sake of brevity we don't discuss why they are true; most of them should be quite intuitive anyway.
- AP distribution and deck building are deeply correlated: a good deck with bad AP distribution will perform badly.
- There are often two similar buffs, one is a weaker version of the other, but obtainable at earlier levels and has a slightly longer duration. Some similar spells scale differently, meaning depending on your AP distribution which is stronger or weaker differs.
- Multiple casts of the same buff or debuff stack with each other additively.
- Stacking a buff and the analogous debuff, e.g. buffing your damage and debuffing the enemy defense, causes a considerable increase in the overall effectiveness compared to simply stacking two similar (or identical) buffs or two identical debuffs, because they will act multiplicatevily with each other.
- Summons statistics are determined at the moment the summon is cast. They do not update dynamically.
- Summons are affected by damage and defense buffs and debuffs applied to you or the enemy in a dynamic way.
- Heal over Time (HoTs) and Damage over Time (DoTs) spells are not dynamically updated. Exactly like summons their statistics are determined at the moment of cast.
- Heal over Time (HoTs) and Damage over Time (DoTs) spells are affected by damage and defense buffs and debuffs applied to you or the enemy in a dynamic way.
- Charging is substantially slower than drawing, thus, while it's nice to improve both (via cards and Attributes), you should be careful to focus more on charging, or your drawing will be useless as you'll always be stuck with a full spellbar.
- Hits look for there target randomly between you and your summons, each having the same chance to get hit, only protector summons will always take the specified percentage of the damage as long as they live. Lowering the damage on the actual target by that amount.
- Spells that diminish the enemy Void Mana, or steal it, are mainly useful in the two key gated locations, as most of the mobs in other zones and Free Roam do not play with that mechanic.
Note: #5 and #7 mean that if you use Rule of Nature or Primal Power after casting a summon or an evocation, respectively, the latter are not affected by the former.
Note: #6 and #8 mean that it does not matter when spells like Empower, Shattering Strike, Magical Weapon, Dreaded Script of Harvest and any other similar one are cast, if they are active they affect all the active summons and evocations. E.g. This means you can cast a summon and afterward cast Empower and the summon would still get the defence buffed.
The way to think about the points #5 to #8 is that the numbers on the spell card are determined at the moment of cast, while the effective damage inflicted or taken takes into account modifier to damage and defense, which are considered at the moment the damage is inflicted or received.
Spellstaff of Chamaon
This spell is awesome, but it has a subtle effect on deck building, as it effectively alters the probability of getting a card from a given color slot, because the card it draws for you diminishes the card counter.
If you want to use it in a non yellow slot, you should understand the implications, which are now explained via an example, in which we will take the expected average over a large amount of draws and thus get cards in red slots 4 times as often and green ones 2 times as often then cards in yellow slots, where the numbers 4 and 2 are arbitrarily chosen for the sake of the example.
Statistically this means you will draw red slot cards 4 times more frequently then yellow slot cards, etc. So you can imagine that on average of the first 28 (just to have nice numbers) cards you draw 16 will be red, 8 green and 4 yellow.
Imagine you put the Spellstaff of Chamaon on a red slot, you will draw it, on average, 16/3 = 5 times (more or less). If you cast this card as soon as it is charged, you will trigger its effect and draw a card from the deck. If drawn normally that card would be 4/7 from a red slot, 2/7 from a green slot and 1/7 from a yellow slot, but thanks to Staff now is 100% yellow!
Note: 4/7 is the probability to extract a red card, based on the fact that red and green slot cards are respectively 4 and 2 times more likely than yellows.
Since the extracted card reduces the card counter, that card is actually drawn from the deck, and even if it would have been a red or green slot card if you drew that normally, you are getting a yellow slot card instead!
The effect can now be very easily visualized by imagining what would happen if you drew your 5 expected Spellstaff of Chamaon at the beginning of the game and used them all immediately. You would have drawn 5 red slot cards and 5 yellow slot cards, of the remaing 18 cards 18/7 = 2.57 would be yellow, 2 * 2.57 = 5.14 would be green and 10.28 red.
While normally you would extract 16 reds, 8 greens and 4 yellow, in the (very extreme) example here made, you would instead be playing with 15.28 reds, 5.14 greens and 7.57 yellows! It's almost like yellow and green slots swapped probabilities!
The effect is very much slot and usage dependent, so it's a hard beast to tame.
Drawing Probabilities
The following are the probabilities of extracting a red, green or yellow slot spell. These probabilities are computed disregarding the currently implemented ways to avoid excessive card redraws, as those might change in the future (but, to be fair, the results are not too different).
The only thing that affects the probabilities is the spellstaff of chamaon, which is assumed to be used immediately after being drawn (otherwise you really need to compute the probabilities at every new card drawn).
| No Spellstaff | Yellow Slot Spellstaff | Green Slot Spellstaff | Red Slot Spellstaff | |
|---|---|---|---|---|
| Draw Yellow Slot Spell | 0.16 | 0.232 | 0.264 | 0.328 |
| Draw Green Slot Spell | 0.32 | 0.3072 | 0.2944 | 0.2688 |
| Draw Red Slot Spell | 0.48 | 0.4608 | 0.4416 | 0.4032 |
As previously mentioned in the example argument (which does not reflect the exact mechanic), a red slot spellstaff switches green slots to less likely than yellow ones.
The probability of drawing spells from a given slot color is uniform.
Void Mana
Void Mana degenerates, so keeping it up requires a bit of planning. It is definitely worth it, albeit not strictly necessary.
Note: it is unwise to use this mechanic while farming the first two key gated locations, as each enemy there is pretty set on using your Void Mana gainst you.
The effects of void mana are:
- Defense buff.
- Damage buff.
- Damage avoidance (in the form of the enemy spell failing and having to restart charging from scratch).
The higher your Void Mana the more effects of the previously listed ones are activated, and the stronger they become.
Even if you want to be pretty sure to have maxed Void Mana for most of each fight, 2 Void Mana spells in your deck should be enough.
It's probably best to keep these cards in yellow slots, or at most having just one in a green slot, as Void Mana won't grow over 100 points.
Deck Types
There are three card types: evocations, summons and incantations. While the first two include many ways to inflict damage, the last one only provides utility, as such it's more of a support tool, but a necessary one to ensure your cards of the previous two types are strong enough to guarantee victory.
Evocation Decks
The main characteristics of these decks are:
- Damage to the enemy mainly comes from evocation spells.
- Evocations lack defensive tools: there is no damage mitigation tool, if you exclude Void Mana effects (which is not enough by itself anyway). Incantations must be used to bolster damage reduction, since summons will likely die too fast due to the AP distribution focusing less on summoning bonus.
- Evocations have good control spells: a spell interrupt, an enemy buff removal and an enemy speed debuff.
- Evocations have good utility: a heal, a drawing helper and two charging helpers.
- Evocation decks rely on big combos (damage buff, enemy resistence debuff, evo buff and nukes) and require good speed as the amount of damage protection provided by incantations is limited, and summons tend to die too fast to be useful.
- Fast charging is critical: since damage limitation is limited, the best option is to evaporate the enemy before it has any chance to do anything!
Summon Decks
The main characteristics of these decks are:
- Damage to the enemy mainly comes from summons.
- Summons not enhanced via Rules of Nature and not protected by any defense buff tend to die pretty quickly.
- The gameplay is slower compared to evocation decks, as the focus is not on trying to draw and charge a big combo, but rather in keeping the summons alive for long enough to kill the enemy.
- This type of deck is a lot safer compared to the evocation one, because after you put up a wall of summons, you suffer barely any damage.
- Summons have rather low damage, but if you protect them and/or buff them, they can definitely kill any enemy, as they have no upper limit of damage they can deal unlike evocations, provided you keep them alive long enough.
- Summons lack control spells: you can only rely on incantation or evocations for them.
- Summons have some utility: a summon heal, a player heal and a drawing helper.
- Summons provide fantastic survivability options: each one of them shields you from damage, and some of them are really good at tanking it!
Hybrid Decks
These decks do not heavily focus on either evocation or summons, but make wide use of both. As such, they are a middle ground that can get all the pros (or cons!) of the other deck types. It's up to you to find the right balance!
Grimoires
This is a list of good decks you can try out if you wish to do so or don't feel like designing your own.
Dirich's Desolator (Evocation Deck)
Note: this was made when the maximum Expedition level was 110, but should still be good.
This deck can beat Free Roam (lvl 140 -150) in 4 to 5 minutes. Each monster can take 15 seconds if you are lucky, if you have bad luck it can take up to 60 seconds. 20-25 seconds is the average.
It's extremely fast paced and while it can feel like you can just cast everything that comes in your hand, there's many cases where you need to make split second decisions that can have huge effect on the outcome of the match, thus mastering this deck does require a bit of thought.
The Cards
The engine is composed by drawing and charging cards, to give the deck the speed necessary to put up with the relatively low Defense and the otherwise slow pace of the minigame.
Cards are always listed by the most powerful (on the left) to the least one (on the right) according to the purpose of the category.
Some cards might appear in multiple categories, if they serve multiple purposes.
Charging cards (deck engine): Spellstaff of Chamaon, Lightning Bolt.
Drawing cards (deck engine): Spellstaff of Chamaon, Spell Focus, Ritual of Power, Ritual of Potency.
Defensive cards: Karnaphen's Spellshroud, Force of Will, Gem Resonance, Primal Power (only if in combo with Force of Will).
Offensive cards: Shattering Strike, Kelphior's Black Beam, Fire Ball, Primal Power, Lightning Bolt.
Keep in mind that the highest probability spells are the red slot ones, followed by yellow and then green (check the paragraph on drawing probabilities).
AP Distribution
30 Endurance
55 Potency
45 Intricacy
10 Savagery (low cost to get massive damage output increase)
50 Sorcery
30 Fitness
Gameplay
The deck is fast paced thanks to its engine cards (charging and drawing).
- Cast immediately all charging and drawing cards (their effects stack), unless...
- ... you stand to gain nothing from the drawing effect (i.e. Spell Focus when you have 6 cards in hand, the two rituals if you can't cast anything immediately)
- ... you can get better effectiveness by waiting to cast your charging spell (e.g. you have few cards in hand, so you wait to have 5 or 6 instead of charging just a couple)
Defensive wise the rules are similar: you should cast everything immediately. You'll be drawing a lot in a short amount of time, but if you keep your hand full you are wasting the effect of the engine cards, and thus weakening the deck due to suboptimal play.
The important things to keep in mind are:
- Primal Power and Force of Will will combo. One Primal Power is enough. Using two Force of Will and one Primal Power provides considerably more healing than using two Primal Power and one Force of Will.
- One Karnaphen's Spellshroud is enough, try to always keep one on the side if you are being unlucky (i.e. not drawing Shattering Strike and 2-3 good nukes) as you must always be under the effect of this spell. Stacking multiple ones at the same time provide increasingly lower benefits anyway.
Offensive cards are a waiting game for your nuke combo.
You need Shattering Strike and 2-4 powerful offensive spells (Kelphior's Black Beam, Fire Ball) to kill an enemy (depending on its type and level). You will need to keep these cards in hand and use them all at once (not when the enemy is protected by a shield effect!).
Important tips are:
- Lightning Bolt is mainly a charging tool, use it according to charging principles, the damage is a bonus on the side.
- Spell Focus is mainly a drawing tool, use it according to drawing principles, the damage is a bonus on the side.
- Spell Focus and Lightning Bolt can provide quite a bit of additional damage when under the effect of Shattering Strike, so always cast Shattering Strike first if you are about to start nuking anyway.
- A single Shattering Strike and 2-4 powerful nukes is usually enough to kill an enemy, but using two Shattering Strikes or a Shattering Strike and a Primal Power can reduce that number to 2-3 (or even just 1, if you also add 1-2 weak damage spells, in case of weak monsters like Tornados and Worms).
Possible Improvements
There's no real need for more defense, thanks to the speed of the deck guaranteeing you are always under the effect of some defensive card.
It's more likely that improvements can be done in terms of AP distribution, trading some charging for some more raw damage, but if the amount of nukes needed for the combo doesn't diminish, there's little point in the extra damage.
Artemi's Awesome Accomplices (Summon Deck)
Note: this was made when the maximum Expedition level was 110, and could probably be improved by the new summon spells added between 110 and 120.
The Cards
In the red slots: Greater Elemental, Guardian of the Canopies and Woodland Creature
In the green slots: Manabeast, Gem Resonance, Karnaphen's Spellshroud, Empower
In the yellow slots: Hallowed Writings, Magical Weapon, Rules of Nature, Shattering Strike, Lighning Bolt
AP Distribution
35 Endurance
25 Potency
35 Intricacy
55 Savagery
30 Sorcery
40 Fitness
Gameplay
This deck is fast for a summoning deck, but still slower then Evocation Decks. It's intended for all Areas currently in the game and can beat Free Roam with only one or two Heal Potions used. It gives you enough bulk to take monster hits until you can send out your summons and thanks to Gem Resonance has recover abilities.
Beware:
Don't send Greater Elemental or Woodland Creature out without any kind of defense, be it a spell or a Guardian summon, they won't live long enough to be worth it. So wait until you have those on hand to send them out together!
You can only have 6 summons out at any time. If you summon a seventh the oldest (the first one in the row) one will be deleted. You can discard summons per right click, so choose which summon to discard yourself instead of just deleting your oldest.
Rules of Nature buffs the summons HP and attack, but only if they're cast while it's active, so if you get one wait until you can cast it, before summoning the next batch if you can.
Foria's Reign of God (Evocation Deck)
Cards
- Major: Shattering Strike, Force Of Will, Spellstaff of Chamaon
- Standard: Hellstorm, Primal Power, Karnaphen's Spellshroud, Ritual of Potency
- Minor: Gem Resonance, Magic Weapon, Kelphior's Black Beam, Fireball, Dreaded Script of Harvest
Attributes
- 30 Endurance
- 69 Potency
- 37 Intricacy
- 0 Savagery
- 64 Sorcery
- 30 Fitness
Gameplay
This deck is an Evocation based deck with powerful defensive options. In general, the goal is to get up Karnaphen's Spellshroud or Dreaded Script of Harvest as quick as possible, and keep yourself healed while you wait for combos. In higher keyed expeditions and Free Roam, you'll want Primal Power + Shattering Strike or Shattering Strike + Magic Weapon and some evocations (preferably Kelphior's Black Beam) to finish off enemies. For tougher enemies, simply add more cards to the combo - and wait if the monster has Block! In lower keyed expeditions or Mausoleum, one debuff/buff and some evocations will be enough.
The attributes are optimized for damage, with the minimum survivability necessary. This is what allows you to one shot enemies with just a couple damage buff/debuffs.
This deck can generally clear all Expeditions without using consumables. However, if you don't draw defensive or healing spells, you may occassionally need to supplement with consumables.
Faster Evocation Deck (Evocation Deck)
The Cards
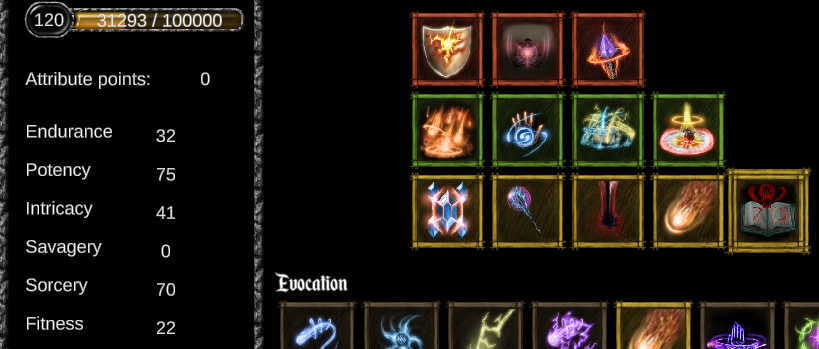
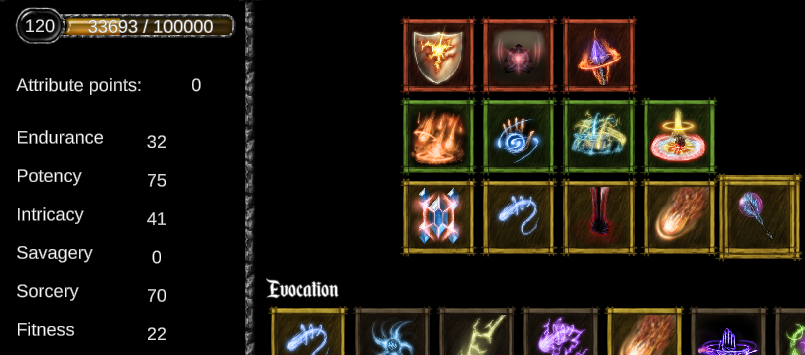
In the red slots: Shattering Strike, Force Of Will, Spellstaff of Chamaon
In the green slots: Hellstorm, Primal Power, Karnaphen's Spellshroud, Ritual of Potency
In the yellow slots: Gem Resonance, Magic Missile, Kelphior's Black Beam, Fireball, Magic Weapon
AP Distribution
32 Endurance
75 Potency
41 Intricacy
0 Savagery
70 Sorcery
22 Fitness
Gameplay
This deck is based off Foria's deck, but is slightly more aggressive by trading a defensive for Magic Missile. This allows it to set up combos quicker go a bit faster, but at a higher chance of needing consumables.
In general, I find this deck can clear Free Roam only using an occassional lesser healing potion roughly about as often as they drop anyway. For Cathedral, this deck sometimes needs to use a couple consumables (mostly for Warbanner/Hallowed Serpent) but is mostly fine. I have not done a lot of tests on Altar yet, but I would recommend using Foria's deck for the improved defense if you're needing too many consumables.
Notable variants:
- Swapping Spell Focus or Lightning Bolt for Gem Resonance will get you a slight amount of speed. Often, you won't have room for all the cards for Spell Focus so it will mostly be wasted (although with enough Shattering Strike/Primal Power/Magic Weapon, Spell Focus can do most of an enemies health by itself). Sometimes you'll draw Spell Focus when you're out of cards though, which is where it can give you some speed. Lightning bolt on the other hand will obviously charge whatever cards you have quick. This will increase your rate of consumable usage a bit.
- If you are doing Mausoleum, I would recommend making the swap, as well as changing Karnaphen's Spellshroud out for the other one. This will get you more damage and you should be able to get through Mausoleum without needing any heals or defenses other than Force of Will most of the time.
NomiSaltium's Evocation Deck
The Cards
Red slots: Spellstaff Of Chamaon, Shattering Strike, Force of Will
Green slots: Hellstorm, Ritual of Potency, Primal Power, Karnaphen's Spellshroud
Yellow slots: Kelphior's Black Beam, Fireball, Voidbolt, Magical Weapon, Dreaded Script of Harvest
AP Distribution
30 Endurance
60 Potency
40 Intricacy
0 Savagery
60 Sorcery
50 Fitness
Gameplay
It's pretty much the same gameplay as the other evocation decks above. Set up your defense whenever you can, and wait for combos before casting your evocations. Wait for Shattering Strike + either Primal Power or Magical Weapon for more damage. If you get all 3 of these spells, that's even better.
You can use Primal Power before Force of Will for more healing. You can also use Primal Power before Shattering Strike to get more value out of the latter. Voidbolt helps a lot with preventing enemies from casting spells, whether it's shields, healing, damage buffs, or powerful damaging spells.
Possible adjustments
If you are at lower levels, then you can fill in the spell slots as new spells become available to you.
- You can use Magic Missile, Spell Focus and Lightning Bolt early on, then replace them when the last 3 spells for this build become available.
- Gem Resonance can be used instead of Force of Will.
- Empower can be used instead of Karnaphen's Spellshroud.
As for AP distribution, I recommend at least 4 points in each attribute (except Savagery) for starters, then prioritize Endurance and Potency for better Drawing and Charging stats respectively.
| AP Distributions at lower levels, 20 levels at a time | ||||
| At level 20 (40 AP): | At level 40 (80 AP): | At level 60 (120 AP): | At level 80 (160 AP): | At level 100 (200 AP): |
| 10 Endurance
6 Intricacy 0 Savagery 7 Sorcery 7 Fitness |
15 Endurance
12 Intricacy 0 Savagery 14 Sorcery 14 Fitness |
20 Endurance
18 Intricacy 0 Savagery 21 Sorcery 21 Fitness |
25 Endurance
25 Intricacy 0 Savagery 30 Sorcery 30 Fitness |
30 Endurance
30 Intricacy 0 Savagery 40 Sorcery 40 Fitness |

